
Introduction
Draping is a garment-development technique in which fabric is shaped directly on a dress form to explore a design’s silhouette, fit, and movement. It allows designers to work with fabric in three dimensions, making it especially useful for soft folds, asymmetrical shapes, and sculptural details.
From a cowl neckline to a gathered bodice, draping helps designers understand how fabric behaves when pinned, folded, and shaped around the body. It can also be combined with flat pattern making to turn an experimental shape into a pattern that can be refined and reproduced.
This guide covers ten draping techniques and garment-shaping approaches, how they work, suitable fabrics, common beginner mistakes, and a practical learning path to get started
Before You Start
Draping and flat pattern making solve different problems. Flat pattern making starts with measurements and paper. Draping starts with fabric on a form. Many designers combine both, developing a shape through draping and converting it into a flat pattern for accuracy and repeatability. Both skills are taught side by side in most fashion and textile design diploma and certificate courses, where you get studio time to practise them under guidance.
Grainline changes how fabric behaves. Fabric cut on the straight grain holds its shape predictably. Fabric cut on the bias, generally the diagonal across the weave and commonly close to 45 degrees to the lengthwise grain, moves and stretches differently. Behavior also varies by fiber and construction, so the same technique can look and handle differently across materials.
A muslin is a working draft, not the finished garment. Designers usually drape on inexpensive muslin first to test the shape and fit before committing to the final fabric.
Not All Ten Entries Are the Same Category
These ten are not all the same type of thing, and treating them that way can make the list more confusing than useful. Cowl, bias, gathered/shirred, twist, pleat, and spiral draping describe specific ways of manipulating fabric on the form. Each has a fairly repeatable process that produces a recognizable result on its own.
Asymmetric, drop-shoulder, halter, and the draped bodice work differently. These describe garment styles or shaping approaches that are commonly developed through draping, but they are usually built by combining several manipulation techniques rather than following one fixed method. A halter neckline, for example, might involve gathering, careful shaping around the bust, and reinforced pinning at the neck strap, all applied together to achieve that particular style. Keeping this distinction in mind while reading the list helps explain why some entries have a single, describable technique and others describe an outcome that can be reached in more than one way. Each entry below is labeled accordingly.
The Basic Draping Workflow
Most draping projects follow the same core steps, whatever technique is used:
- Prepare the dress form with taped reference lines at center front, center back, bust, and waist.
- Mark the grainline on the muslin so it can be aligned correctly and checked afterward for shifting.
- Set balance lines matched to the form’s markings, to confirm the fabric sits evenly and hasn’t twisted.
- Shape and pin the fabric according to the chosen technique, checking it against the reference lines.
- Mark construction points, including seams, darts, and notches, while the fabric is still on the form.
- Remove and true the muslin, correcting the lines on a flat surface so seams match up correctly.
- Transfer to a checked paper pattern, adding seam allowances and testing again if needed.
10 Draping Techniques and Garment-Shaping Approaches
1. Cowl Draping
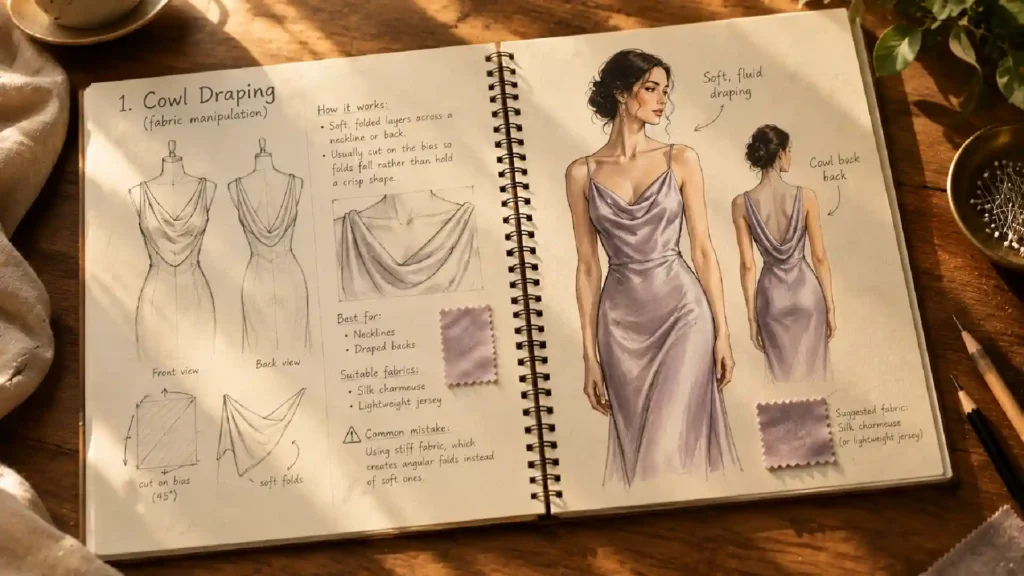
Soft, folded layers across a neckline or back, usually cut on the bias so folds fall rather than hold a crisp shape. Mistake to avoid: using stiff fabric, which creates angular folds instead of soft ones. Best for necklines and draped backs. Needs silk charmeuse or lightweight jersey.
2. Bias Draping
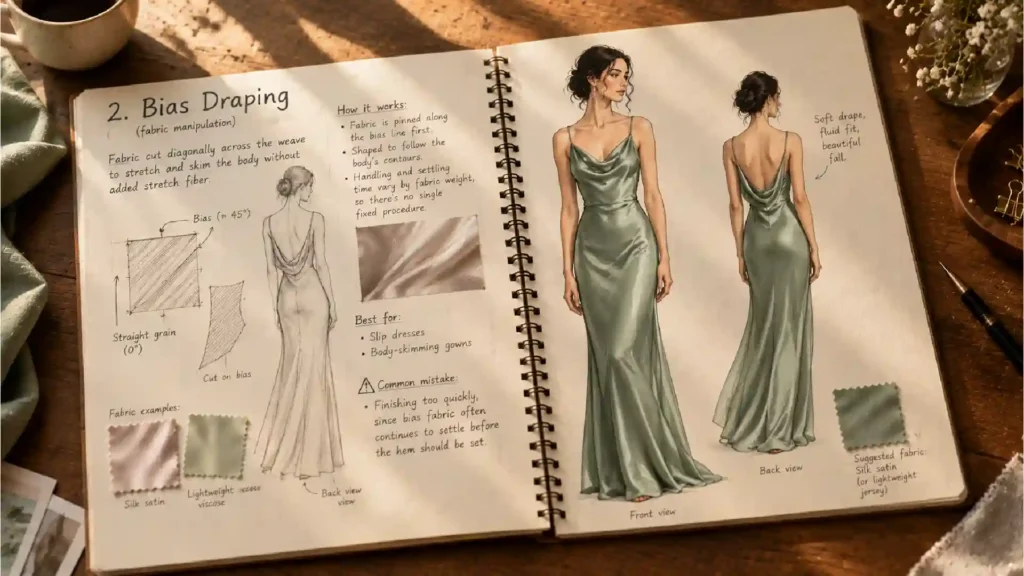
Fabric is cut diagonally across the weave to stretch and skim the body without added stretch fiber. Handling and settling time vary by fabric weight, so there’s no single fixed procedure. Mistake to avoid: finishing too quickly, since bias fabric often continues to settle before the hem should be set. Best for slip dresses and body-skimming gowns.
3. Gathered or Shirred Draping
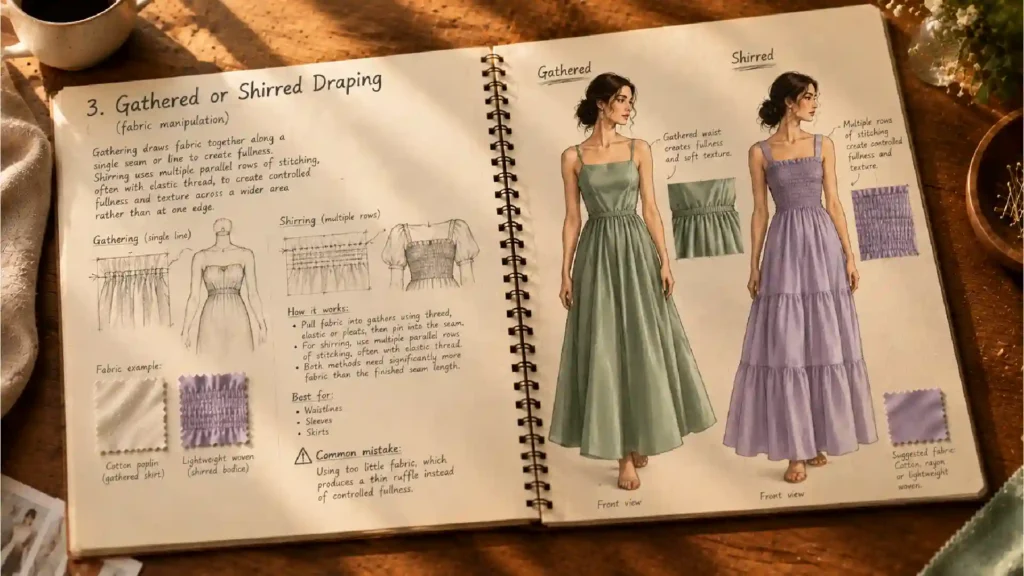
These two are related but not identical. Gathering draws fabric together along a single seam or line to create fullness. Shirring generally uses multiple parallel rows of stitching, often with elastic thread, to create controlled fullness and texture across a wider area rather than at one edge. Both need meaningfully more fabric than the finished seam length. Mistake to avoid: using too little fabric, which produces a thin ruffle instead of controlled fullness. Best for waistlines, sleeves, and skirts.
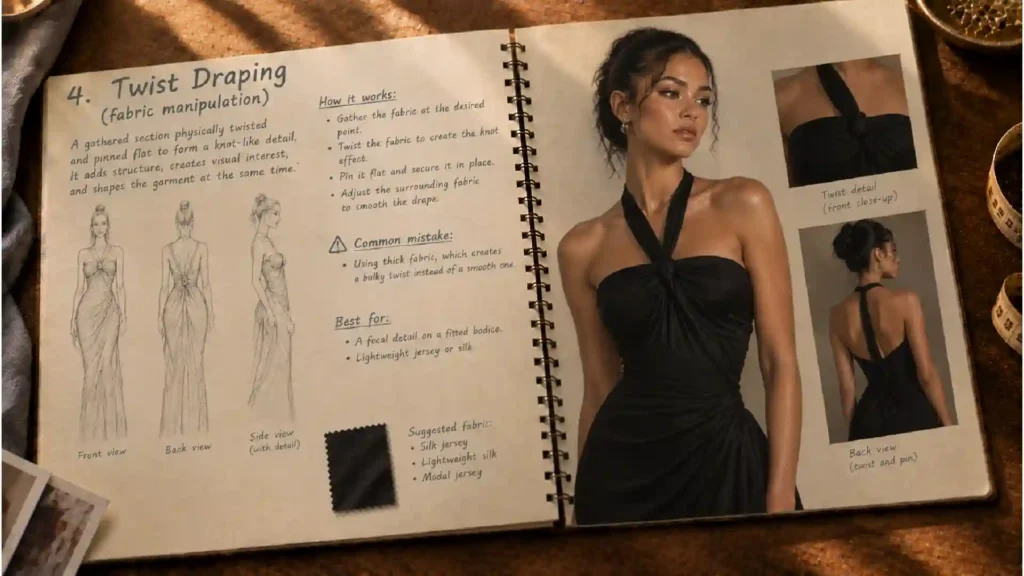
4. Twist Draping
A gathered section physically twisted and pinned flat to form a knot-like detail. Mistake to avoid: using thick fabric, which creates a bulky twist instead of a smooth one. Best for a focal detail on a fitted bodice, in lightweight jersey or silk.
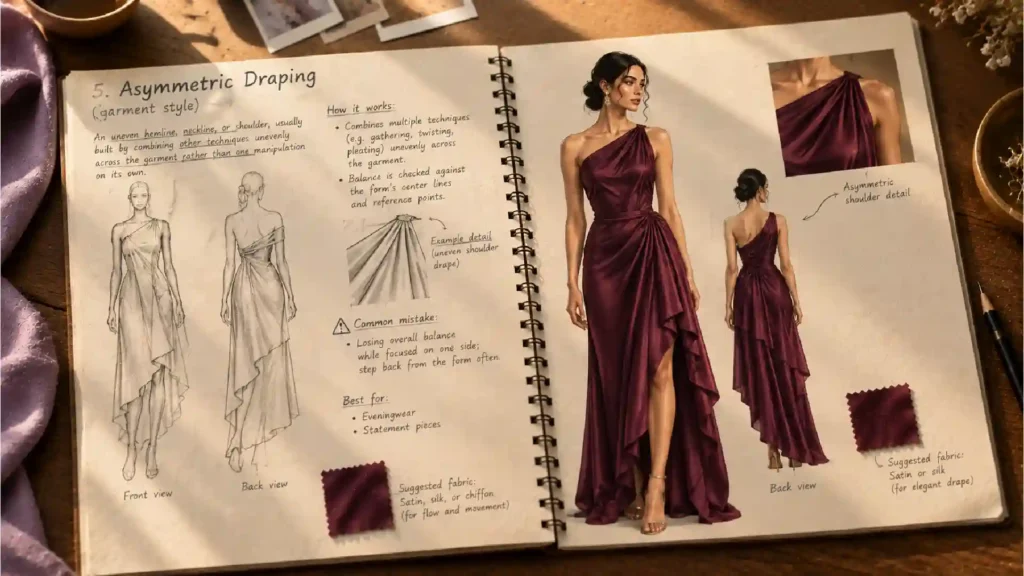
5. Asymmetric Draping
An uneven hemline, neckline, or shoulder, usually built by combining other techniques unevenly across the garment rather than one manipulation on its own. Mistake to avoid: losing overall balance while focused on one side; step back from the form often. Best for eveningwear and statement pieces.
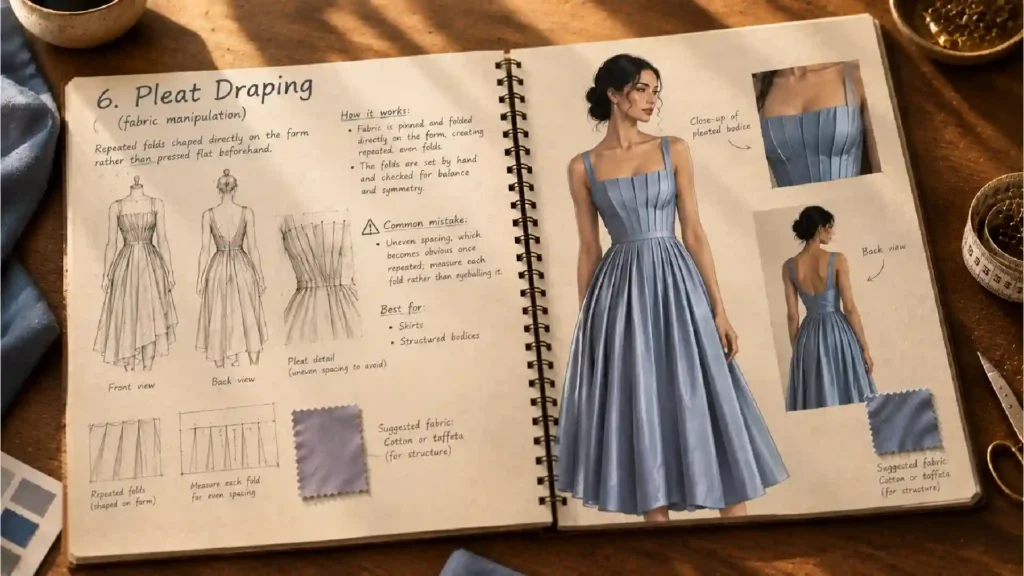
6. Pleat Draping
Repeated folds shaped directly on the form rather than pressed flat beforehand. Mistake to avoid: uneven spacing, which becomes obvious once repeated; measure each fold rather than eyeballing it. Best for skirts and structured bodices, in cotton or taffeta.
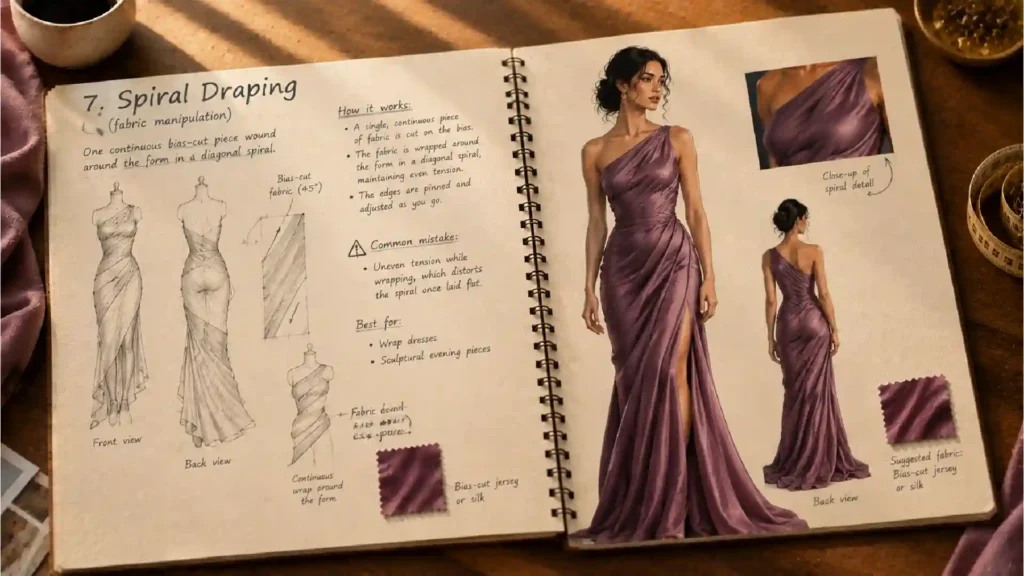
7. Spiral Draping
One continuous bias-cut piece wound around the form in a diagonal spiral. Mistake to avoid: uneven tension while wrapping, which distorts the spiral once laid flat. Best for wrap dresses and sculptural evening pieces.
8. Drop-Shoulder Draping
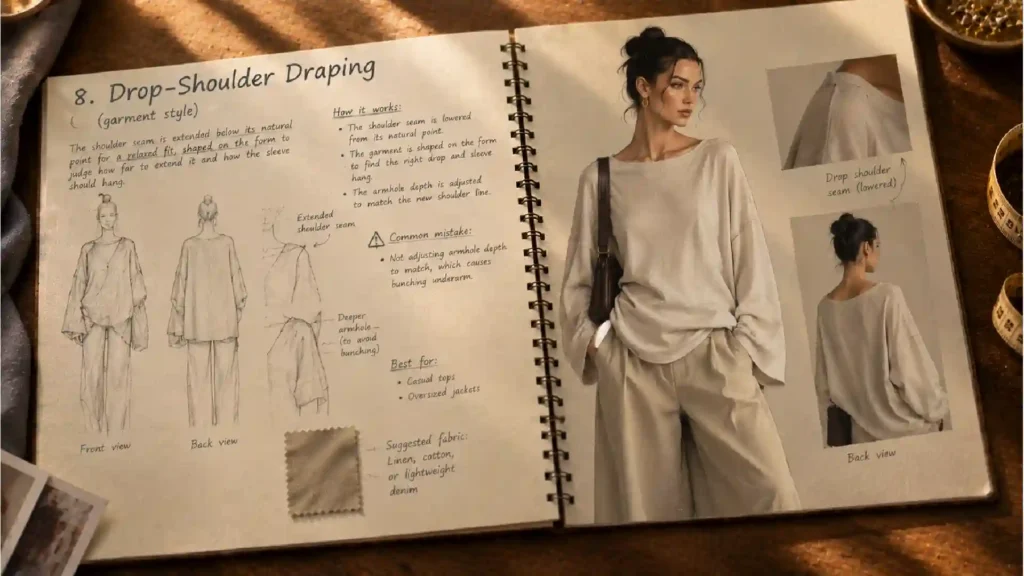
The shoulder seam extended below its natural point for a relaxed fit, shaped on the form to judge how far to extend it and how the sleeve should hang. Mistake to avoid: not adjusting armhole depth to match, which causes bunching underarm. Best for casual tops and oversized jackets.
9. Halter Draping
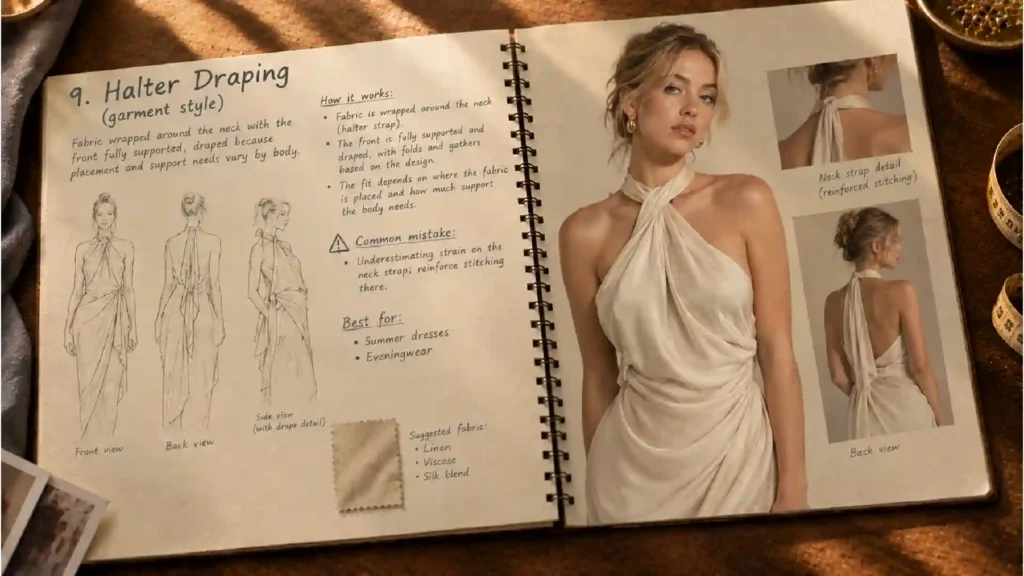
Fabric wrapped around the neck with the front fully supported, draped because placement and support needs vary by body. Mistake to avoid: underestimating strain on the neck strap; reinforce stitching there. Best for summer dresses and eveningwear.
10. Draped Bodice
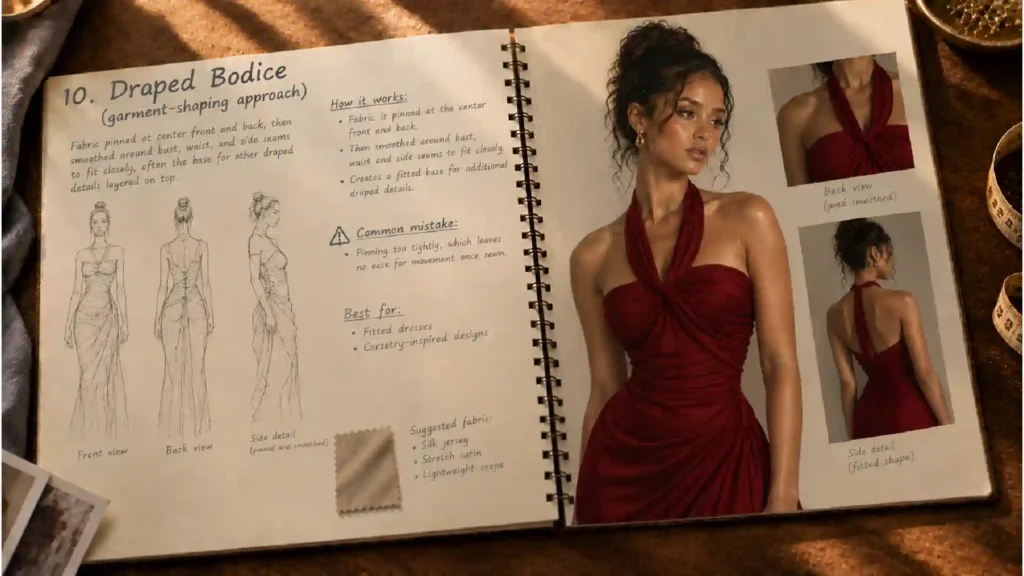
Fabric pinned at center front and back, then smoothed around bust, waist, and side seams to fit closely, often the base for other draped details layered on top. Mistake to avoid: pinning too tightly, which leaves no ease for movement once sewn..Best for fitted dresses and corsetry-inspired designs. Learning to fit a bodice with an instructor checking your balance lines is a core part of fashion design courses.
Comparison Table: 10 Draping Techniques in Fashion Design
| Technique | Suitable Fabric | Beginner Difficulty | Typical Garment | Visual Effect |
| Cowl Draping | Silk charmeuse, soft jersey | Moderate | Necklines, dress backs | Soft, folded layers |
| Bias Draping | Silk, lightweight satin | Advanced | Slip dresses, gowns | Body-skimming fit |
| Gathered/Shirred Draping | Cotton, lightweight woven | Easy | Waistlines, sleeves | Controlled fullness |
| Twist Draping | Jersey, lightweight silk | Moderate | Fitted bodices | Knot-like focal detail |
| Asymmetric Draping | Varies by design | Advanced | Eveningwear | Uneven, statement silhouette |
| Pleat Draping | Cotton, taffeta | Moderate | Skirts, bodices | Repeated, textured folds |
| Spiral Draping | Bias-cut jersey or silk | Advanced | Wrap dresses | Diagonal, sculptural wrap |
| Drop-Shoulder Draping | Cotton, wool, denim | Easy | Casual tops, jackets | Relaxed, oversized fit |
| Halter Draping | Cotton, silk blends | Moderate | Summer dresses | Open shoulders, supported front |
| Draped Bodice | Cotton muslin, stable fabric | Easy to moderate | Fitted dresses | Close, structured fit |
Practical Example: Draping a Simple Cowl Neckline
A cowl is one of the more approachable techniques to start with, since it relies mostly on gravity and fabric weight rather than tight control over tension or measurement. Here is how a beginner might approach it from start to finish:
- Mark center front and both shoulder points on the dress form using tape, so there are clear reference points to work from.
- Cut a rectangle of muslin on the bias and pin it to the form at both shoulder seams, leaving the fabric between them unpinned.
- Let the fabric fall loosely between the shoulder points rather than pulling it taut. The fold should form on its own under the fabric’s own weight.
- Adjust the fold by hand, checking it against the marked balance lines on both sides to confirm the drape is even and not pulling toward one shoulder.
- Once the fold looks correct, pin the sides of the muslin to the bodice front to hold the shape in place while you finish marking it.
- Mark the fold lines, shoulder points, and any notches directly onto the fabric with a fabric pencil while it is still on the form, since these details are easy to lose track of once removed.
- Carefully remove the muslin from the form, lay it flat, and true the lines, correcting any distortion that happened when the curved shape was flattened.
- Transfer the corrected shape onto pattern paper, add seam allowances, and check the pattern once more before cutting it in the final fabric.
Working through this project a few times, ideally with slightly different fabric weights, is often more useful than reading about the technique alone, since it shows directly how fabric choice changes the depth and fall of the cowl.
Common Mistakes
Beginners tend to run into the same handful of issues while learning to drape, and most of them come down to fabric handling or skipped steps rather than a lack of skill.
- Choosing a fabric weight that doesn’t match the technique. A soft cowl needs a soft, fluid fabric, while a crisp pleat needs something with more body. Using the wrong weight is one of the fastest ways for a technique to look wrong even when the pinning is done correctly.
- Losing track of the grainline while pinning. Once the grainline shifts out of position, the finished garment can twist or hang unevenly, even if the shape looked fine while still on the form.
- Skipping balance line checks. Without regularly checking fabric against the marked reference lines, it’s easy to end up with a shape that looks fine up close but sits unevenly once viewed as a full garment.
- Over-pinning and distorting the fabric. Too many pins, or pins placed too tightly, can stretch or pucker fabric in ways that don’t reflect how it will actually behave once sewn.
- Skipping the truing step before making a paper pattern. Fabric taken off a curved form needs to be corrected and squared off on a flat surface, since curved shapes don’t translate to flat paper without some adjustment.
- Attempting advanced techniques before building basic control. Techniques like spiral and bias draping ask for a level of tension control that is much easier to develop after practicing simpler techniques first.
A Suggested Learning Progression
This order is a general suggestion rather than a strict sequence, since difficulty can shift depending on the fabric, design, and learner. Many beginners start with gathered/shirred and drop-shoulder draping to build basic pinning and balance-line skills, then move to the draped bodice to learn fit and dart placement. From there, cowl and pleat draping build control over fabric fall, followed by twist and halter draping once shaping feels comfortable. Asymmetric, bias, and spiral draping are usually attempted later, since they tend to demand more control over tension and balance.
Why Structured Education Helps
Draping can be easier to learn with direct feedback, since a shape that looks correct on the form can still fail once it’s sewn, and it takes practice to catch the difference in advance. A balance line that is very slightly off, for example, is often hard for a beginner to notice on their own but immediately visible to someone with more experience looking at the same form.
Structured fashion design courses typically include guided studio time where an instructor can correct pinning technique, grainline placement, and fabric handling in real time, rather than after the fact. This kind of feedback loop is one of the things that can be harder to fully replicate through video tutorials or written guides alone, simply because draping is a physical, hands-on skill that benefits from someone watching the process as it happens, not just reviewing the finished result.
FAQs
Gathered or shirred draping, since it doesn’t require precise bias handling.
A properly sized one gives the best results, though an adjustable form works while learning basics.
Yes. A draped bodice base often carries a cowl, twist, or gathered detail on top.
Bias-cut fabric can keep settling under its own weight, so some patterns need to hang before the hem is set.
It’s common for concept development, but the shape is usually converted to a flat, trued pattern before production, since flat patterns tend to grade more consistently.
Very stiff fabrics are hard to shape by hand and can hide pinning mistakes. Mid-weight cotton muslin is the standard starting fabric.
Conclusion
These ten techniques and garment-shaping approaches introduce a range of commonly encountered ways designers use fabric directly on a dress form, from manipulations such as cowl and bias draping to styles such as halter and drop-shoulder designs. They are not an exhaustive list of every draping method used in the industry, but they cover a solid, practical starting point for understanding how fabric can be shaped rather than only drafted on paper.
Understanding the shared workflow behind them, from grainline marking and balance lines to a trued paper pattern, matters more in the long run than memorizing any single technique, since that workflow is what turns an experimental shape on a dress form into a wearable, repeatable garment. For a beginner, the most useful next step is usually to practice one or two of the simpler techniques by hand, using the workflow outlined above, before moving on to the more demanding ones later in the list.
Ready to turn practice into a skill set? If you want hands-on guidance with draping, pattern making and garment construction, explore the courses in fashion and textile design at Le Mark Institute.